Saturday, 7 December 2013

mango layer cake

I have a friend who is rather partial to a mango so it seemed fitting to make a mango cake for her birthday.  The problem was, how to incorporate this very wet fruit into a cake without ending up with a soggy mess.

So I decided to start with a basic Victoria sandwich cake and man-go from there

225g stork
225g caster sugar
4 eggs
225g self-raising flour
2 tsp baking powder

Cream the stork and caster sugar together.   Beat in the eggs then add the flour and baking powder.  Divide the mixture between 2 greased and lined 8" (20cm) sandwich tins and bake at 180c for 25 minutes.  Leave to cool

300ml double cream, whipped
1 large can mango, drained with liquid reserved
1 sachet gelatin

Slice each of the sandwich cake width-ways so you have four layers.  Keep the best, most level layer for the top.  Blitz the mango to a pulp in a food processor and begin to layer up - cake, cream, mango pulp, cake, cream, mango pulp....etc.  Keep a couple of tablespoons of the pulp back.  End with the best layer of cake.

To make the mango jelly.  Pour half of the reserved mango juice into a saucepan and bring to the boil.  Sprinkle the gelatin on top and whisk in until blended.  Add a couple of tablespoons of mango pulp to give it a really vivid colour.

At this point I was wondering how the hell I was going to get this jelly on top of my cake without it either running off or soaking into the sponge.  I decided the best way was to line one of the sandwich tins I had used for the cake with clingfilm, pour the liquid in, and allow to set overnight in the fridge.  This is how I discovered that my fridge isn't perfectly level!

In the morning I had a perfect sized piece of vibrant yellow mango jelly to top my cake with.  I carefully placed this on top of my cake and smoothed any slightly rough edges of the jelly with a pallet knife warmed in boiling water.

Ta Da!


Sunday, 10 November 2013

Movember palmiers

Had a fancy on for some cinnamon so I thought I'd have a go at palmiers today.

Palmiers, also known as elephants ears and coeur de France, are delicate little pastries made across Europe.  Each country seems to have their own version and name but I think they look like crazy little moustaches so perfect for Movember!

Normally made with puff pastry I thought I'd have a go with rough puff

For the pastry
175g plain flour
pinch of salt
100g butter
100ml cold water

Chop the butter into small cubes and add to the flour and salt.  Pour in the water and combine to make into a ball.  Chill the pastry for about 20 minutes and roll into a rectangle about 200mm by 100mm.

Fold the bottom third into the middle, then the top third down so you end up with the three pieces on top of each other.  Give the pastry a half turn then roll out again and repeat the folding.

Repeat this process 4 times and then wrap and put back in the fridge for half an hour.

To make the cinnamon filling:
40g melted butter
60g light muscavado sugar
2 heaped tsp ground cinnamon
30g flaked almonds crunched up

Mix the ingredients together

Once the pastry has chilled roll out into a rectangle about 300mm by 150mm and smooth over the cinnamon filling.  Roll the two longer sides into the middle sealing with a moistened finger to hold.

Wrap and return to the fridge for half an hour.

Slice the roll about 5mm thick and place on a baking tray.  Bake at 200c for about 20 minutes until golden and crispy.  I defy you to wait until they are cold to try!


Saturday, 19 October 2013

chocolate orange muffins

One for the ladies at work today, choccy orange muffins

250g self-raising flour
1 tsp baking powder
1 tbs cocoa powder 
50g stork
75g caster sugar
2 eggs
zest of 2 oranges
juice of 2 oranges
milk
150g plain chocolate

Melt the chocolate in a bain marie and leave to cool

Rub the margarine into the flour then stir in the sugar, cocoa powder and orange zest.

You need 250ml of liquid so measure out the orange juice and make up with milk. 

Mix the wet ingredients into the dry, then add the melted chocolate

I had some crunchy chocolate cake thingies so put them in at this point.  However, on reflection, I don't think they made any difference at all.

Pour the mixture into 12 muffin cases and bake at 200c for about 20 minutes.


They smelt really chocolately and the smell was seeping out of the tin on the way to work.  Due to the plain chocolate these were drier than normal supermarket muffins (which I always fine a bit damp and gluey anyway).


Sunday, 6 October 2013

lemony cake with crispy lemon topping

This is boyfriend's all-time favourite cake.  Actually, it's the only cake he'll eat.  A favourite of mine too, just try not to think too hard about all the sugar!

It's a Mary Berry recipe but I put more lemon in as I like it extra zingy

100g stork
175g caster sugar
175g self-raising flour
1 tsp baking powder
2 eggs
zest of 2 lemons
juice of a lemon
milk

Beat the margarine,sugar  and lemon zest together and add eggs one by one.  Beat in the flour and baking powder.

You need 4 tablespoons of liquid so use the lemon juice and make up the difference with milk.

Pour mixture into an 18cm round greased cake tin and bake for about 35 minutes.

Whilst the cake is baking make the topping by combining:

juice of the other lemon
100g granulated sugar

Once the cake is baked, remove from oven but leave it in the tin and pour over the lemon/sugar mixture while the cake is still hot.  Leave to cool in the tin.

Make a nice cup of tea and eat cake


Sunday, 15 September 2013

purple muffins


Still picking so many blackberries at the moment and there is only so much jam you need to keep you going over winter.  Last week I baked another blackberry tart but this time with windfall apples underneath rather than lemon.  Very nice, but it needs something else.  So this week I'm trying blackberry and cinnamon muffins to see if a bit of spice helps.


280g plain flour
1 tbsp baking powder
130g caster sugar
1 tsp cinnamon
2 1/2 tbsp plain oil
120ml milk
2 eggs
200g blackberries

combine the dry ingredients together
combine the wet ingredients (except the blackberries)
beat the wet into the dry, then stir in the blackberries
divide into 12 muffin cases and bake for about 20 minutes at 180c


Tuesday, 27 August 2013

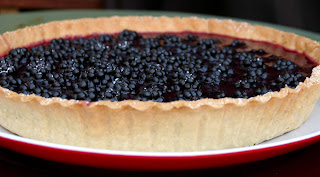
blackberry tart

I picked about a kilo of blackberries at the weekend and made jam.  Went out yesterday and picked a load more so I thought I would make a blackberry tart with a tangy lemon layer.


For the pastry:

150g plain flour
75g butter
1 tbsp icing sugar
water to mix


rub the butter into the flour until it resembles bread crumbs.  Sprinkle in the icing sugar then add water to form a soft pastry.  Grease a 22cm round loose-bottomed tart/flan tin and line with the pastry.  Cover with grease-proof paper, fill with baking beans and blind bake at 180c for about 15 minutes.  Remove the beans and paper, and bake for a further 10 minutes or so until the pastry is cooked and golden brown.

I always line the tin with the pastry but don't trim until after it has blind baked for 15 minutes.  I find if you trim with a bread knife you end up with a nice clean finish.

For the lemon filing:

140ml water
1 lemon (juice and zest)
15g cornflour
1 egg yolk
small knob of butter
55g caster sugar

Put the cornflour in a jug with a couple of spoonfulls of water.  Bring the remainder of the water to the boil with lemon zest and pour this over the cornflour.  Pour the mixture back into the saucepan, add the lemon juice and boil until thick.  Add the sugar and butter and beat until smooth.  When the mixture has cooled down slightly, beat in the egg yolk.  Pour this into the cooked pastry case.

Once the lemon filing has set, arrange the blackberries on top then prepare the blackberry jelly.

For the blackberry jelly:

About 100g blackberries (I used the squashy and small ones that were leftover)
enough water to just stop the blackberries from burning
a table spoon of sugar
6g gelatine

Boil the blackberries with the water and sugar.  Strain to remove all the pips and pulp, then measure out the liquid.  You need 200ml of liquid in total so add more water as necessary.  Bring this back to the boil, sprinkle over the gelatine and whisk until combined.  Allow to cool then pour onto the tart over the blackberries.  Allow to set - takes about 1 1/2 hours in the fridge - and sprinkle with a little icing sugar.

Serve with a cup of tea and a sunny day


Thursday, 15 August 2013

owl cake

A leaving cake for someone at work who likes owls.  It was either that or a lemon cake but the owl won the day. 

I made a three layer cake - two chocolate and one vanilla.  To make the chocolate I used my trusty very chocolate cake recipe in 2 20cm loose bottomed tins.  For the single vanilla layer

115g stork
115g caster sugar
2 eggs
115g self raising flour
1 tsp baking powder

cream the stork and sugar together.  Add the eggs, then beat in the flour and baking powder.  Bake in a 20cm round tin for approx 25 minutes until perfectly done.

I had a slight accident with one of the chocolate layers and actually cracked it in half as I moved it.  Never mind, made up some ganache with 150ml of double cream and 150g of plain chocolate.  With all the skill of a plasterer I smoothed it over and layer up the cake - chocolate cake, ganache, vanilla, ganache, chocolate, with an extra coating of ganache all over to help the icing to stick.  Using ready-made chocolate fondant icing I covered the cake and decorated in a rather 'angry bird' owl fashion.  Not too bad for a first attempt I think. 


Sunday, 28 July 2013

krantz cake

Currently my absolute favourite cookbook is Jerusalem by Yotam Ottolenghi.  It's a beautiful book full of splendid recipes and fascinating pictures.  Everything savoury I've tried so far has been truely delicious so I was keen to try the chocolate krantz cake which is a yeasted cake. 

The only real problem I had was my dough wasn't rising fast enough in fridge and I needed to get some sleep so left it out in the warm for a little while to speed things along.  This meant that the dough was very soft and more difficult to work with.  Also, it meant I didn't get the twists quite as defined and even.

However, it worked. Quite a lot of faffing about a challenge, great fun making it, and really seriously tasty.

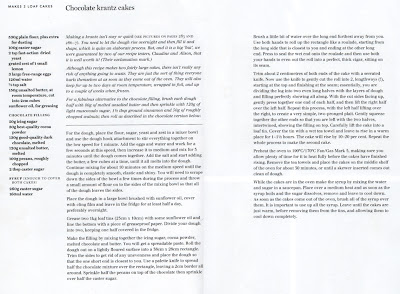
Recipe is quite long so here it is:

(click on recipe if you actually want to be able to read it)


chocolate krantz cake
I decided to make one chocolate krantz and one cinnamon so made half the chocolate filling and then the cinnamon filling as described.  Not really keen on walnuts -I always think they are a bit disappointing.  All that work trying to crack them open, most of them end up in tiny pieces (on the floor, on the dog, down your top) and when you do eventually get one of the little bastards out whole, they taste a bit musty.  I know, buy them really shelled but I still find those plump little nutty brains don't taste a nice as they say they're going to!  So I used almonds instead which I do like.  I think the combination of the almonds, cinnamon and syrup gives the loaf a taste and texture rather reminiscent of baklava.  Everyone who tried both actually said the cinnamon was the best.  One comment was 'seriously delicious'.

Thanks Mr Ottolenghi!


cinnamon krantz cake


geraniums are looking good too!

Saturday, 13 July 2013

raspberry bakewell cake

Not so many cakes coming out of the kitchen lately.  Far too much gardening to do at this time of year but the arrival of the first raspberries and loganberries (apart from the odd ones I've been grazing on) has prompted a cake.  This one is from the BBC Good Food website.  They've got a bit of a thing going with raspberries at the moment so may be more to come.


140g ground almonds
* 140g butter, softened
140g golden caster sugar
140g self-raising flour
2 eggs
1 tsp vanilla extract
** 250g raspberries
2 tbsp flaked almonds
icing sugar, to serve


Pre-heat oven to 160c.  Cream together butter and sugar.  Beat in the eggs one by one then add the ground almonds, flour and vanilla.  Spoon half into a lined and greased 20cm loose-bottomed round tin, top with the raspberries keeping them about 15mm from the edge, then spoon the remainder over.  Sprinkle with flaked almonds and bake (well) for 50 minutes.

Allow to cool and dust with icing sugar.


* I used my trusty Stork once again.  I really should have shares in the company

** only had about 150g of raspberries and loganberries so added a couple of tablespoon of last year's blackcurrant jam to make up the fruitiness.  Seems to have worked out just fine.

Sunday, 19 May 2013

bye bye banana cake


My last Monday in the office so it had to be banana cake didn't it!

I started with a standard Victoria sponge

100g stork
40g golden syrup
60g caster sugar
2 eggs
100g self raising flour
1 tsp baking powder

Normal method, cream together margarine, golden syrup and caster sugar.  Beat in eggs, then flour and baking powder.  If it looks a little thick, add a splash of milk.

Pour the mixture into 2 greased and lined 6" (15cm) sandwich tins and bake at 180c for about 20 minutes until nicely done.

Now to make it bananary and tasty.  Firstly I made a toffee sauce

* 100ml double cream
100g light muscavado sugar
50g butter

Put everything in a saucepan and melt together.  Boil for about 8-10 minutes until it thickens and stops frothing.  Don't be tempted to lick the spoon as it's really, really hot (but delicious)

* I actually had whipped double in the freezer so I used this and it worked the same as double cream when it melted

Once the toffee sauce had cooled I poured it over the insides of the cake and let it soak in a bit.  I had about 200ml of whipped cream left so smoothed this over on top of the toffee sauce then added sliced banana to one side.  Sandwich the two halves together carefully.

To finish off I melted about 40g of dark chocolate in a bain marie and drizzled over the top of the cake making sure it dripped down the sides a bit.

This was just enough for 8 ladies!


Monday, 13 May 2013

happy birthday Julia


A cake inspired by gardening for Julia's birthday.  It's a bit of a wild garden with unkempt grass, daisies and buttercups and not a reflection on Julia's lovely garden.


I used my trusty Very Chocolate Cake recipe and went over the top with the decoration.  For the filling I had some ganache made up in the freezer (more cream left over from St George's Day) and some homemade blackberry jam.  Never tried freezing ganache before but it works well.  Whipped it up before freezing and it came out ready to use.

grass/hair nozzle
To decorate I smoothed some reserved ganache over the sides and decorated with ivy leaves made from ready-made icing with a bit of green colouring in.

The top was green butter icing using a grass and hair nozzle.  Never used this before and it took a bit of getting used to.  You need to squeeze the piping bag and pull up sharply.  I got better as I went along so some of the lawn was a bit uneven but whose isn't?


Daisies, buttercups and butterflies were made using some more of the ready-made icing again in varying colours.


So there you have it, way too much chocolate, sugar and artificial colourings.
Yum!


Pretty pleased with the results and had a great time making it. 

Right, what next?


Friday, 3 May 2013

happy Friday cake

Thursday afternoon was a bit quiet in the office so the ladies decided I really should make a cake for Friday.  Still jam and cream left over from St George's Day scones (cream ready whipped in the freezer) so chocolate cake with cream and strawberry jam it is....

I recently bought a heart-shaped silicon baking mould but haven't had an opportunity to use it so this seemed like the right time.  It's about 20cm across on the widest point and 4cm deep. 

So, for each layer I used

35g melted plain chocolate
85g stork marg
85g light muscavado sugar
20g cocoa
85g flour
3/4 tsp baking powder
1 egg
50ml milk

The usual method - cream together the marg and sugar.  Beat in the egg.  Put the dry ingredients together and add half to the marg/sugar/egg mix.  Stir in the melted chocolate.  Add the other half of the dry ingredients.  Pour in enough milk to make it just right and beat until everything is well mixed in. 

Pour the mixture into the tin and bake for about 20-25 minutes.

Rinse and repeat!  (I only have the one heart shaped mould)

Once cooled sandwich together the two halves with copious amounts of strawberry jam and whipped cream.  I reckon I used about 2 tablespoons of jam and 100ml of double cream whipped up.  I tend to mix the jam and cream together before putting it in the cake as it just makes it easier.

OK so the ganache is a bit rough but it was iced at about 5.30 on Friday morning!
To finish I melted the rest of the chocolate I had (I'd bought 2 100g bars so that would have left about 130g less the couple of squares I ate whilst waiting for the cakes to bake) and made a quick ganache* using around 100ml cream and smothered the cake in chocolately yumminess.  Topped it off with pink fairy sprinkles and ta da!  Happy Friday cake

Love you!


* to make ganache, melt the chocolate in a bain marie.  Whilst it's melting, bring the cream to the boil then gradually beat the cream into the melted chocolate a bit at a time.  Once cooled it can be whipped for a lighter texture.

Saturday, 27 April 2013

orange and raisin scones

This one is for Dad as I know he's partial to scones.  I have rather a lot of whipped cream left over from St George's Day so a good way to use some up.


to make about 8 scones
225g self raising flour
50g butter
2tsp baking powder
25g caster sugar
1 egg
zest of 1 orange
juice of 1 orange
*50g raisins


Combine the flour, baking powder and sugar, and rub in the butter.  Beat the egg and make up the amount of liquid to 130ml with the orange juice and a bit of milk if need be.  Add the orange zest,  raisins, egg and juice to the flour mixture and form a soft dough.  Gently roll it out to about 15-20mm thick and cut up using a 60mm cutter - don't mess it about too much as you want them to be light.  Bake in the oven for about 12-15 minutes at 220c.

Serve with too much jam and whipped cream


* I always soak my dried fruit it boiling water (or tea without milk) for at least 10 minutes before using them as it makes them a bit more succulent.


So scones...the fastest cake in the world...


Sunday, 14 April 2013

breast-ever birthday cake

Making a birthday cake for a friend who is 60 this week.  What does a 60 year old man like?  Hmmm?  I had a few suggestions from other people but decided to do a boob cake.  This is my first attempt at a novelty cake.

Initially I tried to make the entire cake in a 1lt pudding basin to get the right shape but the sponge wouldn't cook properly all the way through.  I was left with an uncooked centre so the outside was munched on with a cup of tea whilst I thought about what to do next.  Second attempt was still in the pudding basin but cooked in the microwave.  Whilst this cooked properly and had a good shape I'm not so keen on the texture of microwave sponges.  They seem more like steamed sponges and have a tendency to go a bit dry once cooled.  That one is now in the freezer ready to make a trifle.  Third (and final attempt) was a basic Victoria sponge, half in the pudding basin for the round top and the other half in a 7" round sandwich tin.

Per boob (as I only did one at a time)

175g stork cake margarine
175g caster sugar
175 self raising flour
1 1/12 tsp baking powder
3 eggs

Beat together margarine and sugar.  Add eggs.  Beat well, then add flour and baking powder.  Pour equally into a greased pudding basin and lined sandwich tin.  Bake at 180c for about 25-30 minutes.  I found the pudding basin section took a longer than the tin.

Leave to cool and do it all again.

I used butter icing and home-made blackberry jam in the middle.  For the butter icing I used 200g butter and 400g icing sugar.  Beat well and try not to eat too much.

For decorating, (after a bit of googling to get some ideas I found a lovely pair by Little Pickers)  I reserved some of the butter icing and covered the cake completely with a thin layer to ensure the icing stuck.  I also made sure the gaps where the two cakes joined were covered to ensure a smooth finish.  To make the flesh colour I used a tiny bit of red food colouring and an even tinier bit of yellow in a block of white ready made icing.  Smooth it over and then go mad on the bra.  The lace was just thin bits of black icing slightly crumpled.

Note to self: make sure you cut your finger nails quite short before doing icing again!

Very pleased with these.


Sunday, 7 April 2013

pineapple upsidedown cake

A seventies special today.  I had a pineapple that was starting to look a bit past its best so pineapple upsidedown cake it is.  Haven't had this for absolutely years and never made it before.

for the pineapple top/bottom
4 thick slices of pineapple
50g light brown sugar
50g butter
glacé cherries

Cream together the butter and sugar and spread over the bottom of a 20cm square lined tin.  Arrange the pineapple in a pretty pattern then put cherries in the centre of the rings and dot some round.  Try not to eat too many cherries!

for the cakey bottom/top
150g stork for cakes
150g self raising flour
150g caster sugar
1 1/2 tsp baking powder
3 eggs
3 tbsp of some liquid*

* use the syrup out of the tin if using tinned pineapple, or honey, or (as I did today) some toffee ice cream sauce left over from the banoffi cupcakes.

Cream together the margarine and sugar.  Beat in the eggs, then the flour, baking powder and liquid.  Pour over the pineapple and bake for about 40minutes at 160c.  Leave to cool in the tin for about 10 minutes to let the syrup set a bit then flip it over and get out the flares.

Easypeasy


Sunday, 24 March 2013

choccy bunnies and easter chicks

Easter next weekend so I think some biscuits are in order.  Choccy bunnies for Boris and some yellow chicks on orange biscuits.

for the biscuits
100g softened butter
100g caster sugar
1 egg
275g plain flour
zest of 1 orange

Cream the butter, sugar and orange zest.  Beat in the egg.  Add the flour and mix together until a soft dough is formed.  I found it was still a little too crumbly so added a squeeze of orange juice.

Roll out until about 5mm thick and using cutters, make into bunnies and chicks.

Bake in a pre-heated oven at 190c for about 15-20 minutes until just golden brown.  Leave to cool.  I then popped them bake in the oven for a few minutes just to crisp them up and biscuits should traditionally be cooked twice*

for the orange topping
about 100g icing sugar
a squeeze of orange juice
a couple of drops of yellow food colouring

Mix together until just liquid but not too much so.

for the orange topping
50g dark chocolate
a squeeze of orange juice

Decorate the chicks with yellow icing and the bunnies with chocolate.  Leave to set in a cool place.

OK, so they're not brilliant but they make me happy!


* The name biscuit is derived from the Latin words bis (twice) and coquere, coctus (to cook, cooked), and means "twice-cooked".  This is because biscuits were originally cooked in a twofold process: first baked, and then dried out in a slow oven.

Sunday, 17 March 2013

hot cross buns

Last week's attempt at hot cross buns wasn't too successful.  I forgot to allow for the fact my oven is fan assisted and managed to burn the tops.  They also ended up a bit too hard so this week is second try.

450g strong plain flour
1 tsp salt
1 1/2 tsp cinnamon
1/2 tsp nutmeg
2 tsp mixed spice
14g yeast (I always use Dove's Farm for consistency)
50g caster sugar
50g melted butter
150ml milk
75ml water
1 egg
*100g currants
50g mixed peel

 *I soaked the currants in some tea before I started as I find they can be a bit too chewy otherwise

Put the flour, salt, spice, yeast and sugar in a bowl and mix. 

Melt the butter.  Warm the milk and water slightly and add to the butter (this cools the butter down slightly which is good.  At this stage you don't want anything too hot to upset the yeast).

Pour the liquids into the flour and add currants, peel and egg.  Work into a soft dough until smooth and elasticy - about 10 minutes by hand or 5 minutes in the Kitchenaid.

Cover the bowl with clingfilm and leave to prove in a warm place for about an hour or until doubled in size.

Knock the dough back and divide into 12 balls.  Flatten slightly with the palm of your hand.

Leave to rise for another half hour on a baking tray then slash a cross on the top with a knife just before putting them into a pre-heated oven at 220c or 200c for a fan assisted for about 15 minutes.

For the glaze
2 tbs granulated sugar
2 tbs water

Melt the sugar in the water over a low heat and boil gently until it's really syrupy.  On my first attempt I didn't boil it enough so it stayed quite wet and sticky.  This time was much nicer.

As soon as the buns are done, brush with glaze and leave to cool if you can.  They smell sooo good!

Check out my buns!


Sunday, 10 March 2013

banoffi cupcakes

Some rather squidgy bananas in the kitchen that really needed eating but I can't stand them once they get the slightest bit of brown on the skins so cupcakes it is with a nod to Ian Dowding's Banoffi Pie.  Banoffi Pie was originally made at The Hungry Monk in Jevington not far from me.  Sadly I never got the chance to visit and it has recently closed.


for 12 cupcakes
2 over ripe bananas
125g stork margarine
*60g Tate & Lyle golden syrup sugar
60g caster sugar
1 tsp vanilla extract
2 large eggs (mine were really small so I used 3)
pinch salt
150g flour
2 tsp baking powder


for butter icing
125g butter
250g icing sugar
** 2-3 tbs toffee sauce

to decorate
more toffee sauce
50g melted dark chocolate

Beat the  marg and sugars together.  Add the bananas and beat until smooth.  Beat the eggs up separately from the banana mix until light and fluffy. Add to the banana mix along with the flour, salt, vanilla and baking powder and mix well.

Pour into cases and bake in a pre-heated oven at 180c for about 25 minutes.  Allow to cool

Make the butter icing and decorate with toffee sauce and chocolate.

* I found this in Waitrose - never seen it before but thought it would add a bit extra toffee-ish flavour to the cupcakes

** The toffee sauce is for ice cream.  If they still made Ice Magic I reckon that would be great on cupcakes too.  I wonder if it would set so hard?


Sunday, 3 March 2013

over the top neopolitan cake

Time for a birthday cake and I've always liked neopolitan ice cream so thought I'd give it a go in cake form.  So, a layer each of chocolate, strawberry and vanilla sponges, filled with buttercream and covered with pink, yellow and brown icing.  Sounds delicate and simple....

for chocolate layer
2 eggs
100g stork margarine
100g caster sugar
100g self-raising flour
1 tsp baking powder
1 tbs cocoa powder

for strawberry layer
2 eggs
100g stork margarine
100g caster sugar
100g self-raising flour
1 tsp baking powder
1 tsp strawberry flavouring
a few drops of red food colouring

for vanilla layer
2 eggs
100g stork margarine
100g caster sugar
100g self-raising flour
1 tsp baking powder

1 tsp vanilla extract
a few drops of yellow food colouring

to make the cakes, cream together the margarine and sugar.  Beat in the eggs then add flour, baking powder, colouring and flavouring.  Pour each into a greased and lined 15cm loose bottom sandwich tin and bake for about 20 minutes until risen and nicely done.

for butter icing
200g butter
400g icing sugar

Cream together and sandwich the layers together keeping a bit back to smear over the cake to ensure the icing sticks.  I also used a bit of homemade blackcurrant jam between the layers just in case there wasn't enough sugar already.

after everyone had tucked in
For the icing I used ready made icing and added cocoa powder for the brown, strawberry flavouring and red colouring for the pink, and vanilla extract and yellow colouring for the yellow.  No holding back on sugar and artificial colourings on this cake!

I had this crazy idea that stripes would look good so wound the icing round the cake in layers, finishing with concentric circles on the top.  It wasn't until later that I realised that this cake looks like it has a nipple on top.  Maybe not the best looking cake I've every made but certainly the most amusing!

Sunday, 3 February 2013

chocolate ginger brownies


Got some eggs that needed using up pronto so decided to give brownies a go.  I only put 50g of the ginger in but next time I think I would increase this as it wasn't gingery enough for my taste.


185g unsalted butter
100g dark chocolate
85g plain flour
60g cocoa powder
50g stem ginger
3 large eggs
275g dark muscovado sugar


Pre-heat the oven to 170c. Grease and line a 20cm square deep baking tray.

Melt the chocolate and butter over a low heat in a bain marie.  Leave to cool

Beat the eggs up until thick, creamy and light then beat in the sugar.  Gently stir in the cooled butter and chocolate mixture.  Sift in the flour and cocoa powder taking care not to knock the air out.

Turn into the baking tray and cook for 35-40 minutes

Leave to cool and cut into 16 pieces.  Don't worry that the pieces are small as you really don't need to eat too much of this in one go.  Even I, a hardened cake-eater, couldn't manage more than a couple of chunks at a time!

Feed to hungry office people with tea

Someone did suggest that it might be nice with walnuts or almonds and cherries in.  Not so sure about the walnuts as they are always a bit of a disappointment.  They look so nice but always taste a bit musty.  Might try the almonds and cherries next time though.


Sunday, 27 January 2013

battenberg

a challenge today to make a Battenberg cake.  Never tried before, probably because I'm not a big fan of marzipan, but once that gauntlet has been thrown down...

Apparently it was made to celebrate the wedding of Queen Victoria's granddaughter - Princess Victoria of Hesse and Prince Louis of Battenberg.

So, once again I turn to Mary Berry for a recipe:

100g marg
100g caster sugar
2 eggs
**50g ground rice
 100g self-raising flour
1/2 tsp baking powder
a few drops of almond essence
red food colouring
3-4 tbsp apricot jam
225g marzipan

**I used rice flour after Googling it and discovering it's pretty much the same thing.  As far as I can tell, ground rice is slightly more course than rice flour.

Pre-heat oven to 160c and line an 18cm square cake tin with greaseproof paper.  I folded up the centre of the paper and put a piece of foil-covered cardboard in this fold to divide the tin into 2.

Cream together the marg and sugar.  Beat in the eggs then ground rice, flour, baking powder and almond essence.  Put half of the mix into the prepared tin.  Add enough red colouring to the remaining cake mix to turn it pink then put into the other side of the tin.

Bake for about 35 minutes and leave to cool.

Slice each colour into 2 equal pieces...not easy, but I found a bread knife worked best.  Stick the pieces together with warmed jam.  My apricot jam had gone mouldy (nice) so I used strawberry instead.

Leave to stick together properly for a bit then brush the sides with more jam.

Roll out the marzipan, making sure it's big enough.  I was quite anal about this and used a ruler.  Place the cake in the centre and fold the marzipan round and seal at the bottom.

Mary Berry suggests a criss-cross pattern on the top.  I dusted icing sugar onto the top and brushed off the loose sugar so it went into the cuts making them more pronounced.

Trim off the ends to give a neat finish then find someone that likes marzipan and make them eat it.

Quite please with the result but still not keen on marzipan

Saturday, 19 January 2013

choc-o-nut cookies

A cold, snowy day requires tea and biscuits after a dog walk, especially when the oven is still hot from baking bread.

makes about 18
90g margarine
110g caster sugar
1 egg
1 tbsp golden syrup
175g self raising flour
75g chocolate
50g whole almonds
1 tsp cocoa powder

Cream together the margarine and sugar.  Beat in the egg and golden syrup.  In a food processor roughly chop up the almonds and chocolate and add to the mixture then beat in the flour and cocoa powder until everything is blended.

Divide and roll into balls around about the size of a greengage or walnut.  Put on a lined baking tray and squish down slightly with a fork.  Bake in a pre-heated oven about 190c for about 15 minutes.  They should be browned but they will still be a bit soft when you take them out.  Try and leave to cool on a wire rack....try anyway.

Enjoy with a nice cup of tea and tired dog


Saturday, 5 January 2013

lemon cake

This is for my beloved; lemon cake is his favourite.

I always use Mary Berry's recipe (which she calls Crunchy Top Lemon Cake) as she makes the best cakes ever and is my cake-hero!  I have a much-loved copy of her 'Ultimate Cake Book' which is covered in jam, sugar and cake mix... testament to how much I have used it.

The only changes I make to her recipe (sorry Mary) are extra lemon juice and zest in the cake, but I do really like it nice and lemony.

to make a 20cm square cake
100g soft margarine (I use trusty Stork)
175g caster sugar
175g self raising flour
1 tsp baking powder
2 eggs
juice of 1 lemon
milk
zest of 2 lemons

Cream together marge and sugar.  Add lemon zest then the eggs one by one.  Beat in flour and baking powder.  Measure the lemon juice, add to the mix and beat in.  Try to remember how much lemon juice there was and make up the amount of liquid to 60ml using milk and beat this in.  I don't like to add the milk directly to the lemon juice as it once went a bit funny (a reaction between the acid and milk).

Put the mix into a lined 20cm square cake tin and bake in a pre-heated oven at 180c for about 30 minutes.

For the topping
juice of 1 lemon
100g caster sugar

Mix together lemon juice and sugar.  Pour over the cake whilst still hot and in its tin.  Leave to cool then turn out and devour!


Yum yum